The rotation manager helps display patterns for permanent employee schedules in Shift Profiles. This can help when working with more complex employee rotations.
Important things to note:
The rotation will only be visible in the shift profile and it must have the same length as the shift you would like to add it to.
Getting Started:
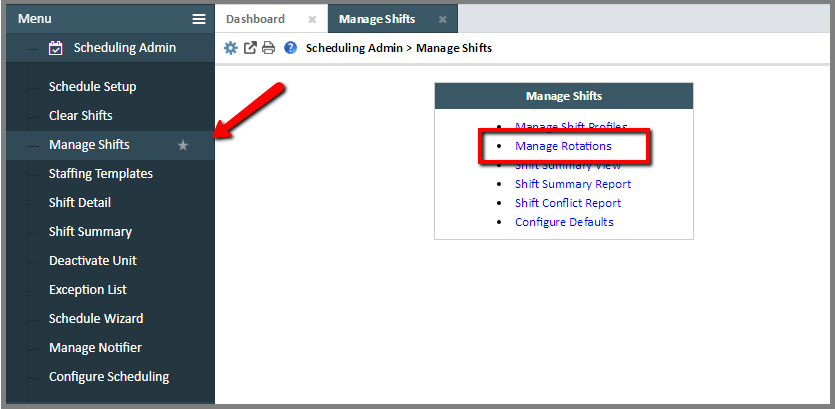
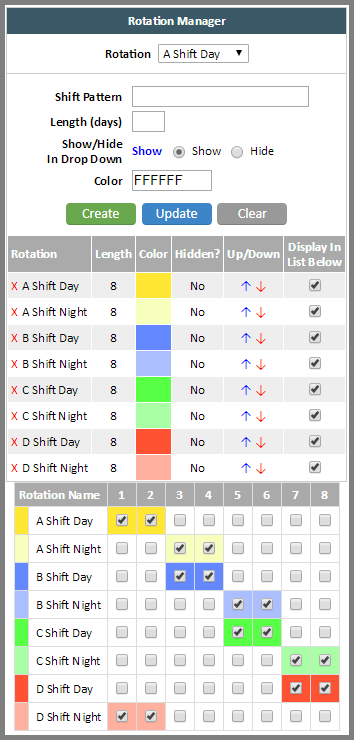
First navigate to ePro Scheduler > Scheduling Admin > Manage Shifts > Manage Rotations.
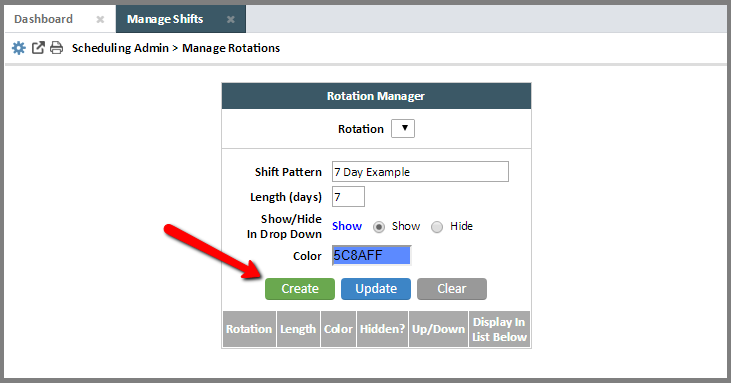
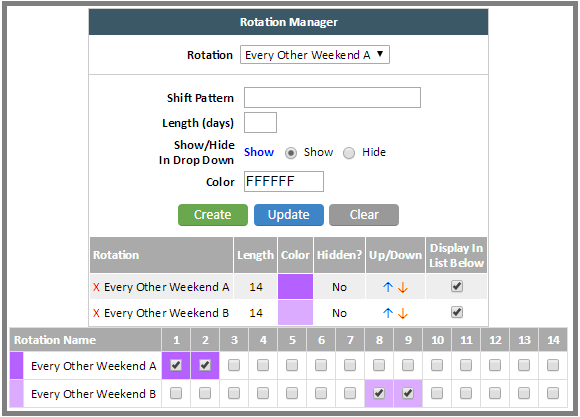
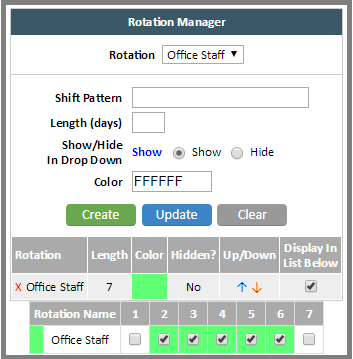
On this page you will name your Shift Pattern, list the length of the rotation, and choose the color you would like displayed. Once you have updated these fields you will click the 'Create' button.
Setting Up The Rotation:
Next you will set the rotation pattern. This will be based on either a specific employee shift or a general shift rotation.
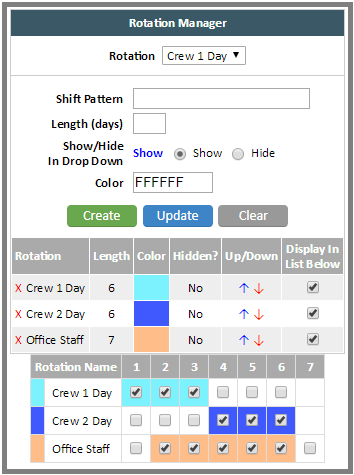
- To choose 'active' days, you will check the boxes beside the rotation you are working with.
- To delete a rotation, you will click on the red 'X' beside the name.
- You can also move a rotation up or down in the sort order using the Up/Down arrows.
- Anytime you need to edit the name, color or length or a rotation, simply click on it in the menu and its settings will populate in the fields above. Once you have made your changes, click the blue 'Update' button. The actual days of the rotation can be updated anytime by simply clicking the days in the rotation itself.
Rotation Examples:
We've put together a couple examples of how the rotation manager can be used to help visualize employee placement.
A) Paramedic
Some of the most common schedules for emergency services involve working several days for long hours and then having multiple days off.
In this example we have paramedic crews working two day shifts, then two night shifts with 4 days off. This would be an 8 day rotation so we will set the shift length to match.
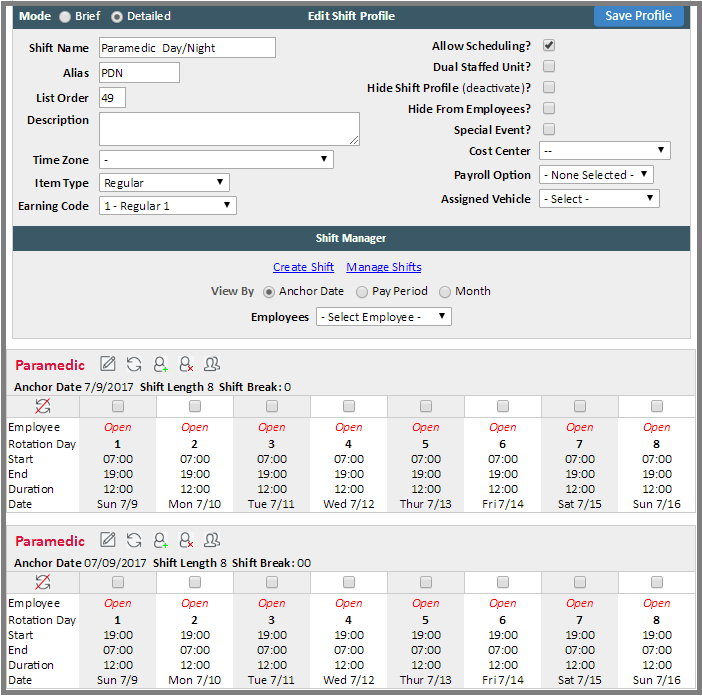
To begin we navigated to ePro Scheduler > Scheduling Admin > Manage Shifts > Manage Shift Profiles. Below shows two paramedic shifts, one with the daytime hours and the second with the nighttime hours.
Next we navigate to ePro Scheduler > Scheduling Admin > Manage Shifts > Manage Rotations.
The rotation would have a length to match the Shift Profile of 8 days. To fully staff this we will need 4 crews, named A, B, C, and D. Each crew will need a day rotation and a night rotation.
Once we've finished updating the rotations, we can begin adding them to the shift profile. To do this navigate back to ePro Scheduler > Scheduling Admin > Manage Shifts > Manage Shift Profiles.
Here we will click on the spinning arrows icon to add the day shift rotation and the employee. Next, click the green 'Save' button.
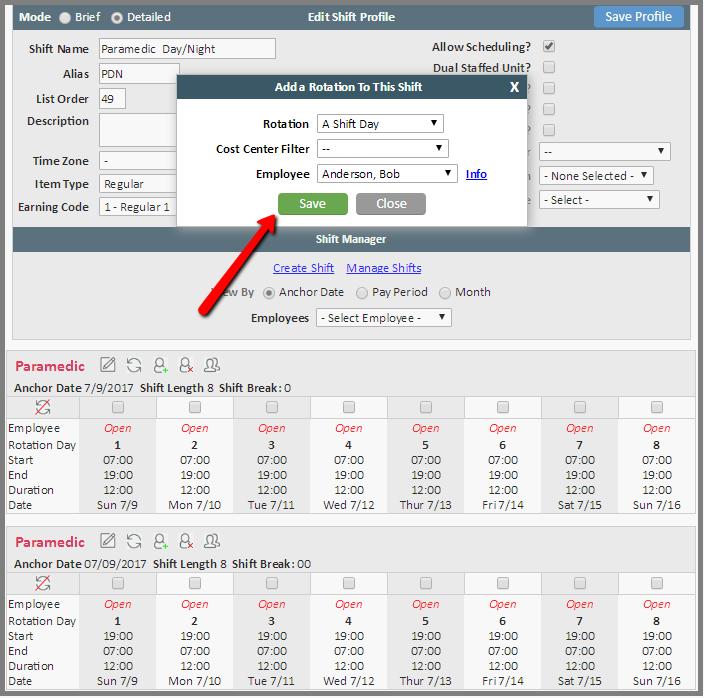
This adds the color coded rotation and employee to the shift. Next we will add the rotation for the night shift by clicking the rotating arrow icon for the night shift.
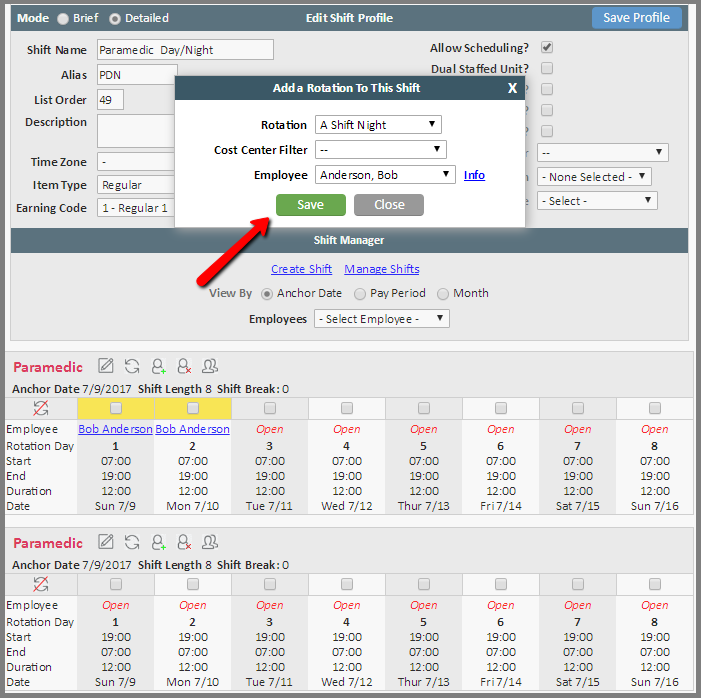
Once we have added all the rotations and employees we have a clear visualization of the rotation order.
Using the Pay Period View. Here you can see how the anchor date is the starting point of the rotation, and how that eventually relates to the schedule over time.
This example shows how this rotation will look from 08/13/2017 - 08/26/2017.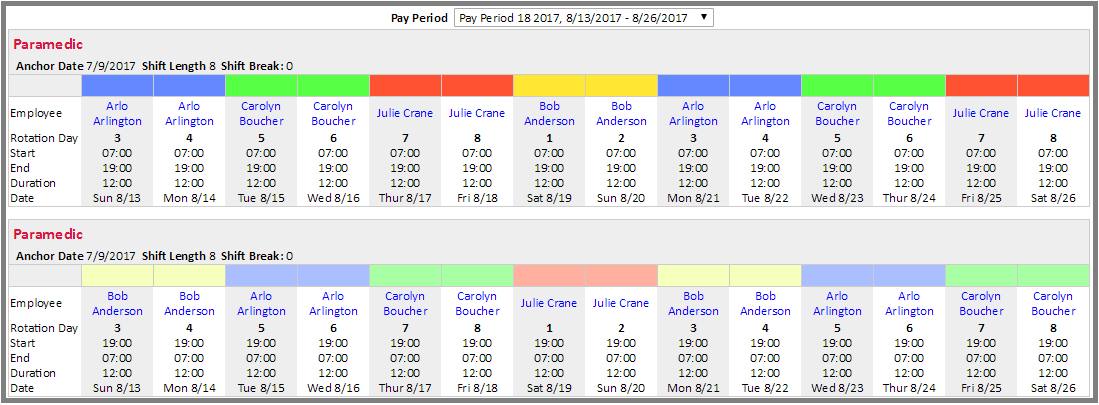
This example shows how this rotation will look from 08/27/2017 - 09/09/2017. 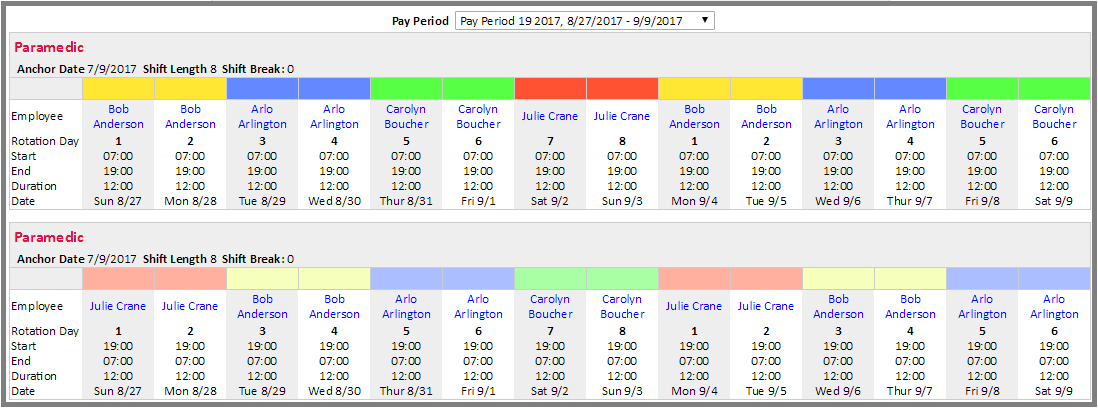
Using the Month view. Here you can see how the anchor date is the starting point of the rotation, and how that eventually relates to the schedule over time.
Below shows how this rotation lines up in September 2017.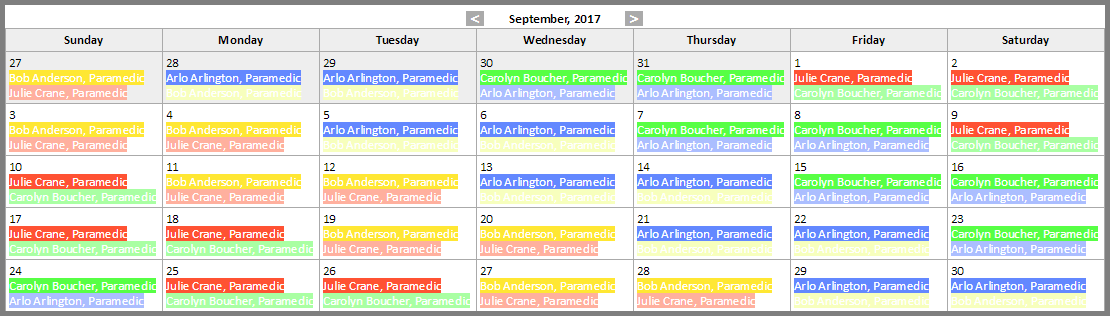
Below shows how this rotation lines up in October 2017.
B) Alternate Weekends
In this example, we have a shift that requires that the employee be available for an on call position every other weekend.
The rotation would have a shift length of 14 days to match the Shift Profile. This would be set up as two separate rotations for each employee, aligned to match the shift profile.
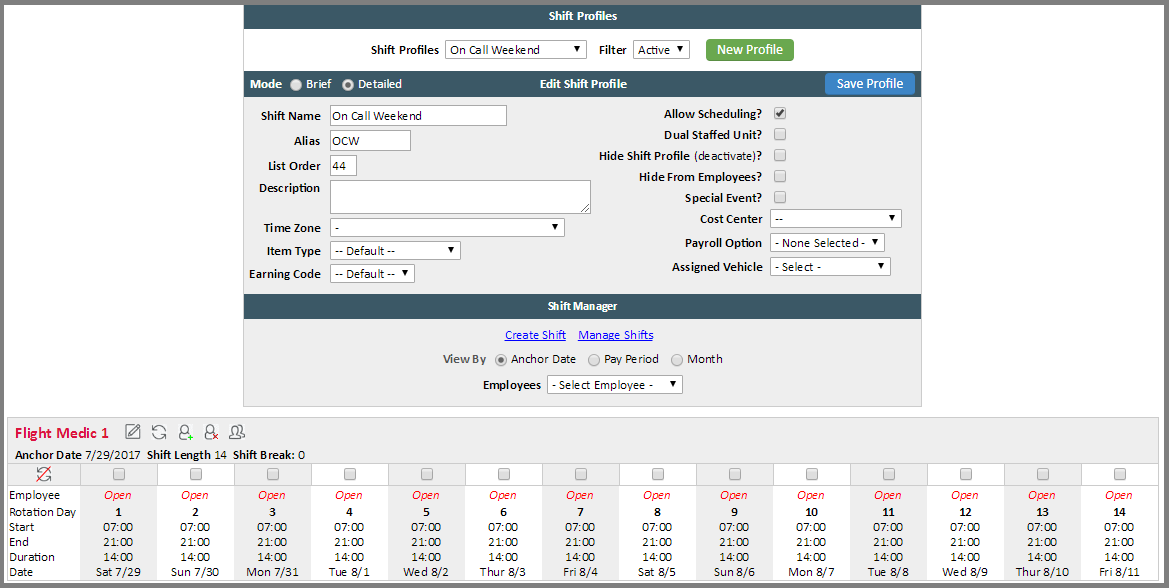
The shift profile is set with a shift length of 14 days and an anchor date that begins on a Saturday.
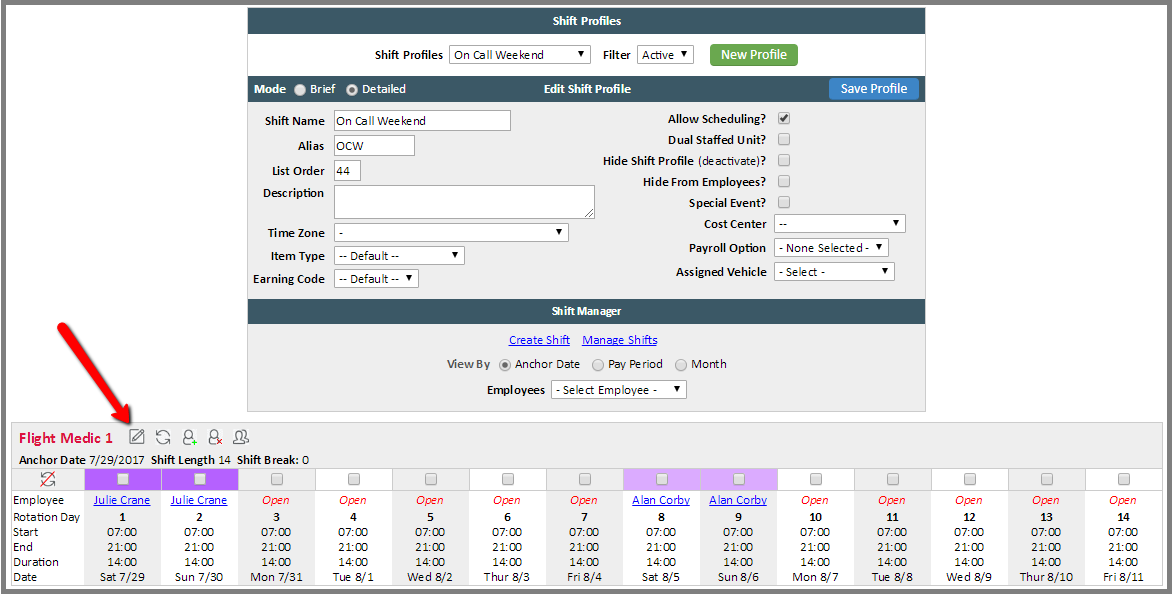
Once you have added the rotation to the shift, you can get a better view of the employee rotations.
This example is only for Saturday and Sunday, so we can disable the additional days that don't need to show up on the schedule by clicking the pencil and paper icon.
This will bring up a new window allowing us to quickly uncheck any of the days of the week that do not need to populate for this shift.
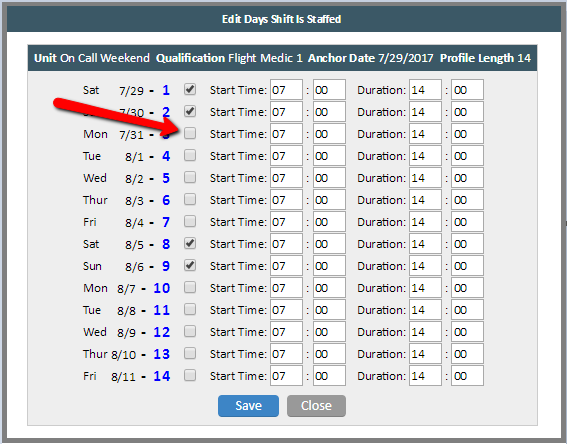
Now those days are listed as off and will not show up on the schedule when it is created.

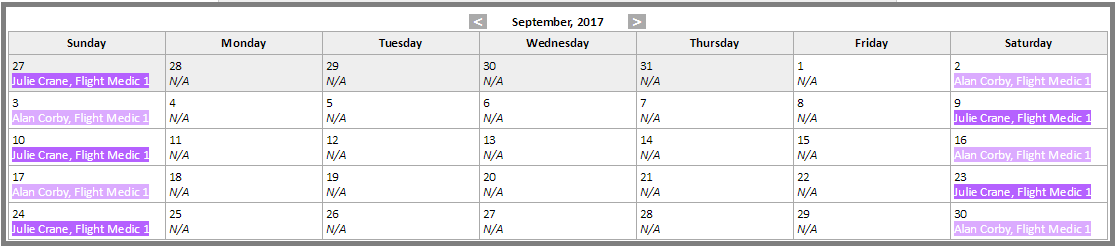
When checking the shift rotations through the month view, you can easily see that the employees are properly listed every other weekend in tandem.
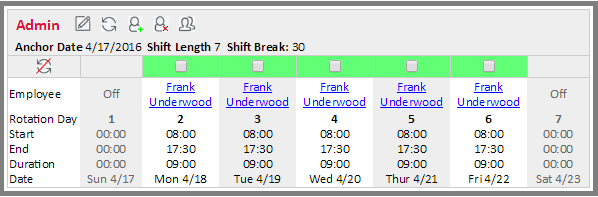
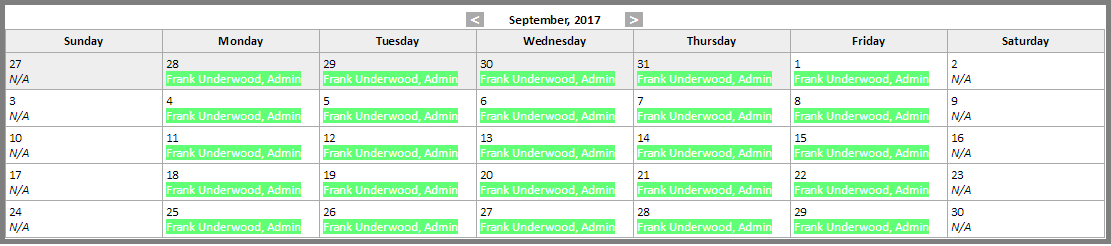
C) Office Staff
For employees working the same schedule every week, you may only need to create a shift length of 7 days. This may often be the case for your clerical or office staff.
In this example, our Admin works Monday through Friday with weekends off. We set our anchor date to begin on a Sunday.
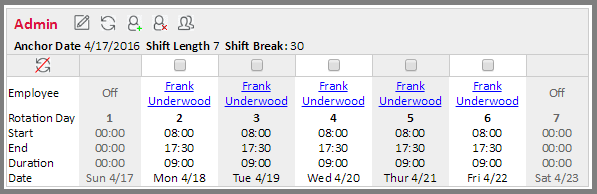
This rotation would have a length to match the Shift Profile of 7 days. The active days for Monday - Friday would be checked.
Adding the rotation to the shift.
Using the Monthly view to see how this rotation looks over time.
Comments
0 comments
Article is closed for comments.